

Most of what's in my house was gotten because it was tolerable (and cheap), but I'm not in love with most of it. So yesterday, I "shopped" around for "me" accessories, and ran across these amazing, ADORABLE jacks at z-gallerie.
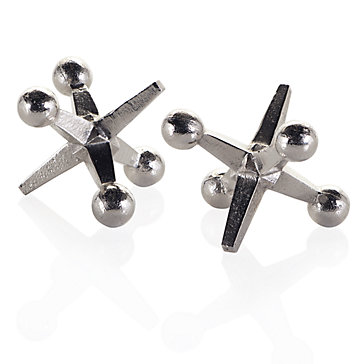
They're 4" jacks that cost $9 each. To be honest, $9 from Z-Gallerie is REALLY cheap, but I wanted 3. So it would be $30 for a few 4" jacks (and that's the cost of the next project I have in mind!).
So it came time to brainstorm.
I know I've seen wooden "balls" for sale at Michael's, but I had no idea what they were called. Thanks go google and the phrase "wooden ball with hole" (genius, huh?), the solution came. They're called Dowel Caps. And they're not sold at Michael's (I wasted an afternoon going to Michael's to check).
A trip to Hobby Lobby and $4.50 later, I had all of the supplies I needed.
For three Jacks, you'll need
-12 - 1 1/4" wooden dowel caps with a 5/8" hole (they come in a bag of 12 for $2.99 - use the 40% off coupon and they're $1.80)
-2 - 5/8" square dowels @ 36" ($1.29 each)
-Rustoleum Metallic Spray Paint in brushed nickel (I already had it, but it's about $3.50 if you need to buy it).
-Wood Glue
-Caulk or Wood Filler
OPTIONAL-
flour/glue/water solution for texture

i'm just going to throw it out there that my first one was a bust and i learned a lot from it, so i'm just going to give you instructions on how i made the other two
The first thing to do was to figure out proportions. I just eyeballed it, and held the dowel caps where I felt it would look "normal" and it came out that these would be 6"(actually, they come out at a 7 1/2" after they're all assembled). So I cut a 6" rod and four 2 3/4" ones (here's how I calculated - the width of the perpendicular piece would have to be 6", too, so I subtracted the half inch that the dowel would take up, and divided it by two, so I could get the length of the dowels at both sides).
ANNND... for those of you who would rather not read my garbling...
Cut List for THREE jacks
3 - 5/8" Dowel @ 6"
12 - 5/8" Dowel @ 2 3/4"
I had REALLY wanted to use thicker wood and taper it, as the z-gallerie pieces are done, but that would've required larger balls which would have substantially increased the price. So I figured out my own taper.

I lined the dowels up, and used another board to clamp them all down to my work table. That held them in place so that I could sand the ends at an angle (and then turn and sand, turn and sand, turn and sand - this was a little tedious, albeit very easy and not too time consuming).
I don't have any pictures of the ends after they were done. I was probably just trying to get my bare feet off of the scorching pavement (i hate shoes and I live in the desert... FAIL!).
The sanding narrowed the ends of the square dowels enough to get them into the round holes on the dowel caps. It also added another interesting detail to the ones that weren't covered.


Wait. Wait... WAIT IF YOU CAN!!!
If you can't, wipe off as much of the excess glue, make sure the dowels are shoved tightly into the caps, and proceed. Just know that the caps may come off... Not that I know from experience... ;-)


Here's why you needed to wait for the glue to dry. You'll need to turn the jack over and suspend it over a glass (or any object that will allow it to sit level, even with the bottom protrusion). Then glue the last piece on.

Now marvel :-)

I had an assembly line goin' after the first one!
To deal with the hole left around the base of the dowel cap, I filled it with paintable caulk and wiped away the excess using spit on my finger (hey... I'm all for using what you have on-hand... uhh... literally!).

Now you could just spray paint these and leave it at that, but I can't seem to make my life easy.
I wanted it to look like the aluminum from my inspiration, which had a mostly flat surface with peaks AND valleys. So I couldn't just distress it and hope that would work. I needed something that I could "smooth" on, but that would dry hard. I fought the urge to just wrap these in aluminum foil and be done, and thought of a few ways to create the texture.
The way I settled on was similar to paper mache. I used mod podge, flour and a tiny bit of water, and rubbed it on a test scrap. When that dried (well, it was at least ALMOST dry!), I spray painted it.

Looks ok to me! So I did that to my three jacks, and sprayed with 4 or 5 thin, even coats.

Can you see them? THERE! In the pile of spray painted rocks! (I discussed my rock "issue" here)
And I ended up with this!


They look awesome! Seriously would have thought you bought them. Great job! And I love the silver rocks too
ReplyDeleteLove, love, love these. So cute. I'll have to read over this tutorial several times. It's more detailed than I thought it would be.
ReplyDeletehaha. SORRY! At least in a blog, you can skip a few paragraphs. I really do use way too many words to say that I'm trying to say - you're lucky you don't HEAR me describe things!
ReplyDelete(my drawn-out way of saying it's easier than I make it seem)
Looks great! I loved jacks when I was younger.
ReplyDeleteThanks! I was saying on my Facebook page that I didn't learn how to play jacks until about 2 years ago. I WISH I'd have played when I was younger!!
ReplyDeleteBrilliant solution! I wouldn't have known where to start!
ReplyDeleteThank you :-) I figured this was too obvious to be considered creative. haha. So that made me feel a li'l better.
ReplyDeleteThose are cute! Just the math alone would have made me stop. :)
ReplyDeleteLooks great, congrats.
ReplyDeleteHaha, luckily I did the math for ya! :-) Thanks!
ReplyDeleteYou did a great job! I've seen those jacks before and I never could bring myself to buy one. Maybe I'll give making them a try when I finish about 20 other projects! I am impressed how you figured out how to make such a good copy! I think you could sell them!
ReplyDeleteThis rocked, you should have been nominated for crafting with the stars, (i didn't make the cut, either. ) would you want to "craft from the sidelines??"
ReplyDeletehttp://redzoegirl.blogspot.com/2011/09/crafting-from-sidelines.html
Cute! They turned out great :-)
ReplyDeletelove them! You are so creative! I just saw your letter bins repinned today, but they didn't credit you. (bah!) Thank you for seeing the possibilities in things and sharing them with us.
ReplyDeleteBtw, I dont have an account on any of the options, so I published as anonymous, but just consider me a fan, but not in a creepy stalker kind of way. LOL
It's ok, if "stalker" slips, it's meant in good spirit :-p Thanks for comin' by!!!
DeleteI think yours look better than your inspiration piece!
ReplyDeleteSo love them. I just mentioned getting big jacks for the office to my hubby a few weeks ago.
ReplyDeleteloved your writing style. your blog is amazing. Have been going through some of your posts, will def. recommend to others.India Independence Day Quotes in English
ReplyDelete